Front Door Painting 101

When it comes to painting a front door, there’s some planning involved to ensure a beautiful finish product. 

Let’s start with prep: 

This step varies depending on what material and/or existing finish is already on the door. Typically, if it’s pre primed or previously painted with latex then you can go right over top with latex paint, again. If it is oil, then you must choose oil paint again or prime first to convert to a latex. Last, if it is a bare substrate (no finish), it is necessary to prime for adhesion. Giving the door a light sand, in any scenario listed above, is also recommended to help with adhesion. 

Prep supplies may include a sanding block, tape (for windows and trim) and primer

Next, choosing the best paint product: 

Any exterior paint is usually appropriate for a front door, but depending on the location of the door in terms of weathering, sun exposure and colour value some products are better suited than others. 

Benjamin Moore’s exterior paint lines consist of: 

Premium Aura (Low Sheen, Satin, Semi-Gloss) 

  • Excellent coverage, durability and washability.

  • Colour Lock technology to ensure longevity of colour value and minimise fading.

  • Available in quarts or gallons. 

Top Line Regal Select (Low Sheen, Soft Gloss) 

  • Great coverage, durability and washability. 

  • Best Seller for its price point and user friendliness. 

  • Available in quarts or gallons. 

Midline Ben (Low Sheen, Soft Gloss) 

  • Good coverage, durability and washability. 

  • User friendly, easy workability 

  • Available in quarts or gallons. 

Aura Grand Entrance (Satin, High Gloss) 

  • Premium coverage, washability and coverage.

  • Latex/Alkyd product (cleans up with water, cures to oil finish). 

  • Has its own colour line with timeless, vibrant tones. 

  • Available in quarts. 


To decide which product to use, consider how much sun and weather exposure the door gets, the vibrancy of the colour and how long you’d like to maintain that specific colour. These indicate whether you want to spend a little more money for longevity of results or less if you plan to sell or change colours more frequently. 

As for Tools of the Trade, it’s recommended to roll or spray a front door and/or brush details. 

Our favourites are using a 4” mini microfibre roller and detailing with a 2” Brilliant Finish brush

Now that we’ve covered prep and product knowledge, onto the fun part - choosing a colour! 

Front doors are a wonderful opportunity to add a pop of colour for curb appeal or to blend and compliment the rest of the house's exterior. If you want your door to be a focal point, going bold is a good idea; whereas if you’d prefer it blend in, matching it to your garage doors and/or trimwork works well for cohesiveness. If you’re stuck, we can certainly help you narrow down your selection in store or with an at-home colour consultation. 

Check out this post for specific inspiration for popular front door colours!

Lastly, a few tips from the trade on ensuring you get the BEST possible outcome: 

  • The minimum temperature recommended for painting outside is 10C for a 24 hour window.

  • Don’t paint when the sun is beating directly onto the door, this will speed up dry time and make it harder to work with and dry properly. 

  • The door must be clean and completely dry to avoid peeling or cracking. (wait 24 hours after or before it rains). 

  • If you need to close the door before it has completely cured, put vaseline around the edges where it’ll touch the frame so that it doesn’t stick to the door and peel the paint. 

  • If you’re going dark or vibrant and need a primer, ask to have it tinted to help with coverage, thus having to do less coats. 

How much paint do I need?

To determine the quantity of paint is a simple calculation of square footage. Keep in mind, this is the measurement of ALL surfaces, not just the floor perimeter. Measure the height of the walls and multiply by the width to find your square footage of one section and then do the same for each wall and add together for the grand total. 

Example: A 9’x12’ bedroom with 8’ ceiling height. 


Wall 1: 9’ x 8’   = 72 sq. ft. 

Wall 2: 9’ x 8’   = 72 sq. ft. 

Wall 3: 9’ x 12’ = 108 sq. ft. 

Wall 4: 9’ x 12’ = 108 sq. ft. 

TOTAL: 72 + 72 + 108 + 108 

= 360sq. ft. 


Benjamin Moore paints cover approximately 400 sq. ft. per gallon, but may stretch in coverage depending on the coverage of colour, porosity of the material and/or the quality of paint line. It is generally recommended to start with less and come back for more or buy potential extra, which can later be used for touch up. 


So, for the above example, 1 gallon would cover the space for one coat and a little extra for a second coat; it may stretch to cover 2 coats or an extra quart may be necessary. Second coats cover better than first, as the paint is already levelled out, so it’s really just to cover up missed spots or streaks! Two coats is always recommended for a beautiful, full coverage finish. 


Typical Coverage of Benjamin Moore products: 

1 gallon: 400sq. ft. 

1 quart: 100sq. ft. 

1 5g pail: 2000sq. ft. 

1 test pot: 25 sq. ft.


What supplies do I need for my project?

There are so many options to get the job done well, most comes down to personal preference; however, here is a compiled list of what we consider as great choices to get you started! 

Brushes

Rollers

Tape

Drop Cloths

Extension Poles

Trays and Liners 

Prep/Repair Supplies (spackling, sanding, patches) 

Extras (can opener, carpet shield, paint pail, etc.) 


Brushes

To choose which brush is best for you, the first question to ask is how well you plan to take care of it. If you want something to last, higher quality brushes like Corona withstand multiple cleanings and always give you gorgeous results. For a cheaper price point and brush that will be used less often while still yielding promising reviews, check out Nour’s brush line: Smooth, Brilliant, Signature and Perfect sash brushes come in multiple sizes and are great for a few uses! 

Another consideration would be what your project entails as to what size and material of brush you should use. For narrow spaces, spindles, or oddly shaped pieces a 1”-1½” would be ideal whereas for cutting in and larger projects are better painted with a 2”-2½”.  As for handles, most paint brushes are wooden handles, but if you’re painting for long periods of time or want to relieve some pressure from your hands, check out short handle brushes! A favourite is the Wooster 2” shortcut brush, with its rubber handle that curves perfectly into your palm. 

Quality and cost also come down to material. Most brushes are a poly-nylon blend that works with all paints (combining the qualities of both materials), but some are pure polyester (bristles will maintain their shape when exposed to heat for a stiffer cut but don’t hold paint as much) or pure nylon (may soften with heat exposure but hold paint well giving a smoother finish). Another material, which is primarily recommended for oil based paints, is one with natural fibre - usually a white China bristle (soft and supple),a blend with ox hair (for a finer finish) or black China bristle (stiffer for high use). The reason for natural bristles for oil based paints is because they can withstand heavier components within oil based paint and their clean up solvents. 

Best Sellers: 

Brilliant 2” Sash Brush 

Corona Cortez 2½”

Wooster Shortcut 2” 

Bennet ¾” Angle Brush  

Rollers

Similar to brushes, choosing a roller mostly comes down to material, size and purpose of use. For most large surfaces (walls, ceiling, floor, etc.) a 9.5” roller and cage is standard size and for smaller surfaces (trim, doors, cabinets, etc.) there’s 3”,4”,6” sizes. Rollers are often differentiated by whether they “lock” roller sleeves into place or not; this is key so you’re not constantly fussing with a sliding roller while painting. 

As for sleeves, majorly for wall surfaces you will want to choose a microfibre blend so that it doesn’t shed lint and offers a smooth finish. When selecting a roller, there’s different nap sizes to choose from which are essentially how fluffy a roller is and how much paint it will hold. For regular size rollers, 5mm-10mm are short naps, 13mm medium and 15mm-18mm being the largest. As you go up in size, the more paint the roller will hold and less you’ll have to dip back into your tray; however the heavier it will get to carry, too. For smooth surfaces, like most drywall, can be applied with an even layer and a 10mm-15mm works best, 13mm being the fan favourite! For rougher surfaces, like stucco or brick and sometimes concrete, you want a higher nap size to ensure you’re getting into all the crevasses of the substrate. For heavily textured surfaces, check out a split foam roller! Lastly, for rolling a ceiling, keep in mind you want the least amount of splatter while painting so if it’s a flat surface, 5mm-10mm is ideal and for stucco/popcorn ceilings, 13mm is more suitable. 

As for mini rollers, there are more choices of materials for those more special projects like cabinetry and furniture painting. A smooth, spray-like finish can be achieved with the right tools. Again, this is determined by the nap size and also material. A smaller roller pile means less paint being held on the roller, but easier to create a smooth finish because of how it drags the paint (multiple thin layers is easier to obtain than fewer thick coats, which is all dependent on how quickly it’s applied, temperature, and dry time). For most projects, microfibre and mohair are good choices. Foam is great for alkyd and not so great for latex because it tends to bubble from soaking up so much paint and drying out quickly as opposed to oil’s naturally longer dry time. 

Best Sellers: 

Nour Tradition 13mm Roller Sleeve 3pk 

Wooster Cage Frame 

4” Mini Microfibre 2pk 

4” Mini Mohair 2pk 

4” Pin Handle 

Tape

You may come across green, blue, yellow and sometimes purple tape while shopping and besides the width, you may question what the difference is. Simply put, it’s the level of adhesion that’s created through the process of manufacturing the tape. The desired level of stickiness varies depending on what you need it for. For simple cutting in around edges, trim and ceiling the most standard is 3M green painters tape. If you require more particular line work, for example if you’re painting stripes or shapes, Frog Tape would be a good choice because of its precision. Yellow Frog Tape is designed to cover delicate surfaces, such as uncured paint or substrates that get sticky more easily, like glass. Then, there’s more variations like blue or purple which are all made for specific reasons like for tough to stick to surfaces, rough surfaces, etc. 

Best Sellers: 

1 ½” 3M Green Painters Tape 

1 ½” 3M Green Painters Tape Multipack

1 ½” Green Frog Tape 

Drop Cloths

Save the floor! Cover the couch! Whatever you do, don’t get paint where it’s not supposed to; use a drop cloth for prevention of a stressful outcome. We have disposable plastic that covers 9’x12’ in three weights, as well as boxes of plastic rolls for those bigger projects. Or, whether you’re environmentally conscious, looking for an investment or want quality protection, shop for reusable canvas drop cloths, in multiple sizes. 

Best Sellers: 

Plastic Medium Duty 9x12 Drop Cloth

Canvas 8’x12’ Drop Cloth 

Extension Poles

Extension poles make painting at height much easier and safer. Sizes range from 2’-12’ and are primarily universal to most cage frames. The main component to consider when deciding on the right pole is whether it screws in (like most standard) or has a clip attachment. Poles are usually wood and extension poles are a plastic or metal material. 

Best Sellers: 

Dynamic 3’-6’ Pole

Trays and Liners 

How big is your project and how much paint needs to be poured out? We’ve got trays and liners to fit lots or little! Trays are not generally made universally through companies, so take note of the size before shopping for more liners. 

Best Sellers: 

ZTR250 tray compatible with RTL250 liners

ZTR30 tray compatible with RTL30 liners

ZTR200 tray compatible with RTL200 liners


Prep/Repair Supplies (spackling, sanding, patches) 

Prep tools are the foundation of a beautiful finished project. Let’s consider a few narratives. 

Fixing Holes

For small nail holes, you’ll need spackling, sandpaper/blocks and a putty knife. Spackling compounds vary in quality based on their elasticity and how they harden when dry. For drywall, Drydex Spackling Compound is a great choice for small nail holes; especially with its feature of going on pink and drying white when it’s ready to be sanded. For certain substrates like plaster that tend to crack, Alex Plus Spackling or DynaPatch are solid choices because they provide a finish once sanded that doesn’t flash (highlight contrast of finishes) after it’s been painted over.

Best Sellers: 

Drydex Spackling 

DynaPatch Spackling

Putty Knife

Sanding Block

Straining & Storing

Overtime, paint can thicken, clump, harden, or create a skin. Most situations are salvageable and paint can last upwards to 10 years, if stored properly. The first thing to do is check the condition of the paint, if it’s frozen, rock hard, or too thick it is rendered unusable; but, if it just has a thin skin on top or a few bubbles or chunks or even rust, then remove the skin and strain the rest into a new can. Other times, the paint simply needs to be shaken well, so if you’re ever unsure bring it into your local store to be checked! 

Best Sellers: 

1g Strainer 

Empty Gallon 

Primer 

Prepping a surface for paint is essential to be done well. Primer’s main focus is for adhesion and coverage. Certain substrates are very porous (like wood and concrete) and will soak up paint quickly, so instead of wasting high quality paint, use a coat of primer first, to seal the material and save time and money. For painting walls, the rule of thumb is anything “bare” needs to be sealed first, or like previously mentioned, it will soak up all the paint and need more coats. The other narrative is if you’re needing good coverage with certain colours - black to white, vibrant to neutral and vice versa. Although it is an extra step, primer generally saves you more time, money and energy in the long run. 

Best Sellers: 

Step One 

Freshstart 

STIX 

Stripper/Remover 

It is always interesting to see the removal of layers and layers of past projects, to try and get back down to the raw state of material. The best way to do this is using a chemical stripper, like Smart Strip, which is a biodegradable formula that’s safe for the environment and excellent at removing multiple layers of paint/stain. All you have to do is apply, let the liquid sit and do its thing and then scrape off; this may need multiple attempts depending on how many layers and how long you let the chemical sit for. 

Best Sellers: 

Smart Strip 

Extras/Miscellaneous

With the essentials covered, the only thing left are the products to enhance the painting experience! Some things to always have on hand are paint can openers, Handy Paint Pails - useful for painting at heights, Carpet Shields or Trim Guards - to use with or instead of tape to protect flooring/ceiling/other walls. Glass scrapers can be helpful for scraping paint off hard surfaces.

Best Sellers: 

Paint Can Opener

Handy Paint Pail

Handy Paint Liners

Mini Glass Scraper


How do I decide which Benjamin Moore paint product to use?

When it comes to selecting paint, there are a few questions to ask to ensure you’re getting the best product for your project. Clancy’s Rainbow - Benjamin Moore carries 4 main interior paint lines and 3 exterior, as well as a handful of specialty products. Generally, as the price point increases, you’re receiving more quality coverage, durability, washability and longevity of colour value. This is because of the chemical process involved in creating each paint; typically the higher quality it is, the thicker the paint consistency, providing better results. 

When determining which paint line to use, consider the colour, sheen, and location. Colour impacts this choice because the darker and/or more vibrant a colour is, the harder it is to cover (both coating over a dark colour and painting a dark colour light). 

Sheen is a consideration primarily for matte finishes and this is because the higher the quality of paint, the more washable it will be. Although matte is the best for hiding existing blemishes, it tends to scuff more, so choosing a higher quality paint will add more resistance to scuff marks. On the flipside, semi gloss is the best for washability, but it will highlight existing blemishes. 

Lastly, keep location in mind for determining the best product. High moisture areas should be protected with paint that has mouldecides and mildewcides built in, like Regal Select and Aura. Generally, higher traffic areas like kitchen, hallways, entrances require better protection from scuffs and thus higher quality paints work better to not have to touch up as often. For areas more susceptible to fingerprints, stickers and innocent drawings with crayons (a.k.a. kid’s rooms) either choose lower grade paint if you think you’ll be changing colours more frequently or higher quality scuff resistant paint, like Scuff X, to ensure durability throughout the growing years. 

See the chart below for an overview of the main products available and their advantages.

How do I know if my paint is latex or oil?

How do I know if my paint is latex or oil?

How to tell if my paint is oil or latex?

It’s very important to know whether your paint is oil or latex because it can guide you to what you’re able to use on top of the existing paint. Latex can cover latex or oil primer; oil can cover latex or oil products. Sometimes, it can be difficult to tell which is which when it’s old paint; so, here’s a few examples of the differences:

Read More

How to: Paint Furniture

Have an out-of-date piece that needs some revamping? Or maybe you’ve found a hidden gem on the side of the road that needs some TLC. Whatever it is, don’t fear for Clancy’s is here to help you create a jaw-dropping piece with high-quality paint.

Here is all you’ll need to get the job done right!

Prep Supplies

  • TSP

  • Drop Cloths

  • Painter’s Tape

  • Sanding Blocks

  • Tack Cloth/Microfibre cloth

  • STIX Primer

Paint Supplies

  • Advance Paint

  • Brush(s)

  • Mohair/Microfibre Roller 4”

  • Roller Handle 4”

  • Mini Paint Tray

Let’s get started!

PREP

Take off any pieces you don’t wish to be painted or cover them with plastic/tape.

CLEAN

Ensure the piece of furniture is free of grease, dust, dirt and grime to ensure maximum adhesion with products. Use soap and water or TSP (a heavy duty degreaser) for hard to clean spots.

SAND

To ensure the best adhesion, sanding is always recommended. Whether it’s varnish, old paint, or factory finished materials, sanding will create a flat surface to apply paint to.

CLEAN again

After you’ve sanded, it’s important to get rid of any and all dust residue so that it won’t clump up the paint. A tack cloth (sticky to pick up dust easier) or a microfibre cloth work best!

PRIME

For BEST adhesion practices, priming is vital because it creates the base coat for the paint to stick to. Its process of adhesion differs from sanding because it also aids in coverage for the paint. When a substrate is bare, it is usually quite porous, so priming will help seal the base coat for the finish coat to cover better on top. For extra coverage, ask to get your primer tinted, especially when doing darker colours.

STIX primer is an excellent high adhesion primer for any hard-to-stick surfaces. It is both interior and exterior and is available in quarts or gallons at your local Clancy’s Rainbow Benjamin Moore dealer.

PAINT

Now is finally time for the best part! Benjamin Moore’s waterborne alkyd paint called Advance is an excellent product for furniture. This product cleans up with water but dries to a hard oil-like finish to ensure maximum durability. Available in Pearl, Semi-Gloss or High Gloss finish in both quarts and gallons tintable to almost any colour, you have plenty of options for your project needs. Advance is great to use in a sprayer, rolled on or brushed on; it has excellent leveling properties to not see so many brush strokes for your finished piece.

Key Notes about Advance:

  • Dries to touch in 4-6 hours (meaning it’s safe to move a piece if you need to adjust things)

  • Re-coat time is 16 hours (doing it before it is dry may result in paint peeling because wet paint won’t stick to semi-wet paint very well)

  • Cure time is 5-7 days minimum (this varies depending on environment - humidity, heat, etc.)

Patiences is a virtue when it comes to painting, and mostly it’s about the prep, but the payoff is well worth the time and effort! Repurposing furniture has many benefits and is accessible for more than just professionals to obtain high quality results!

Finding the Perfect White Paint Colour

You’ve searched for hours on Pinterest, read all of the design blogs, watched every show on HGTV and you think you’ve decided on the perfect white - not too gray, not too yellow - and you go to the paint store to pick up a sample only to take it home and realize it’s STILL NOT RIGHT! 

We hear stories like this all of the time and can understand how frustrating it can be; who knew how hard it would be to pick a white? It can feel overwhelming with all the choices, especially since white isn’t even a colour. White is a tint, so it’s important to note that it’s impossible to have a white without any undertones. 

Painting your walls white has been a very popular trend for quite some time because it allows the space to feel larger and more airy. Decorating is easier because almost everything goes well with white, so you have plenty of workability with the neutral shade. 

Now, how do you find the perfect white for your walls? There are a couple things to consider when browsing: 


  • Does a cool or warm tone fit your space better? 


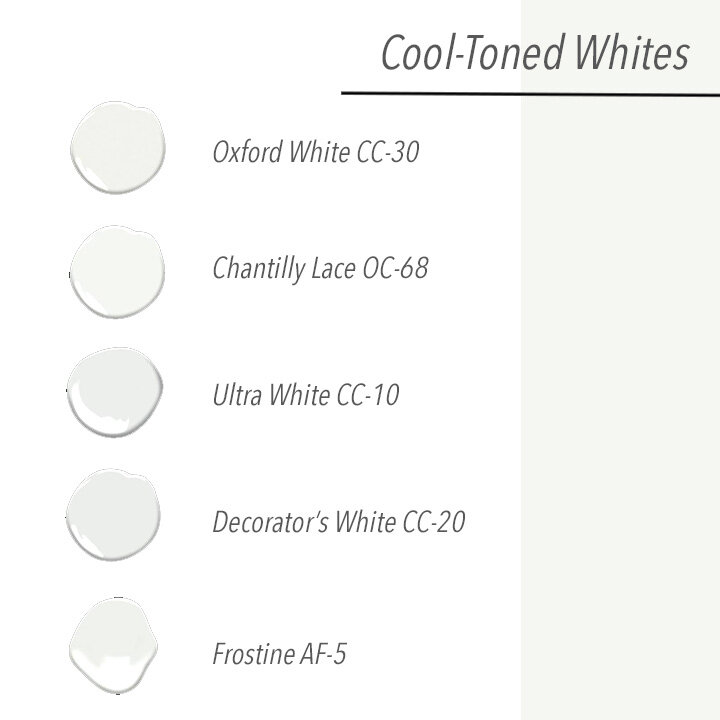
Cooler whites tend to have undertones of blue or gray while warmer whites will have undertones of yellow or pink. If you have a more modern, minimalistic, or prefer stark, bright whites then cool is the way to go; whereas, warmer whites tend to be softer, more subdued, and great for complimenting other warm tones in a space. 


  • Do you want to match your trim or have contrast? 


It is quite common to have an entire space (ceiling, walls, and trim) to be the same white, just in different sheens. It makes the space feel much bigger and open. However, that’s not everyone’s cup of tea so if you prefer having more contrast, make sure you compare the trim white and the white for your walls to ensure they blend well. A tip to not make your walls look dirty in comparison to a crisp white trim is to choose shades that have similar undertones (warm with warm and cool with cool), that way you see less of the undertone because it won’t contrast the temperature difference. 


  • What is your lighting situation? 


No matter what colour you choose, lighting will play a huge effect on the way it appears in a space. Do you have pot lights? A single dome light? Just lamps? The more light you have, the starker the white will appear and depending on the colour of bulb you have, it will determine if your light is warm or cool. Another thing to consider is what direction your window faces because natural light will also play an effect on how you see colour. West and East facing will get more sun exposure, creating a warmer atmosphere whereas North and South tend to be cooler with the lack of sun. So what does all of this mean? Typically, you will want to choose the opposite temperature to balance out the light and undertones. For example, in a North facing room, if you have a cool white, you may notice a blue undertone because the lack of sun exposure will make it feel much cooler; but, if you use a warm white, it’ll balance out and look more neutral and pleasing. 

Okay, so now you’ve decided whether a warm or cool white will suit your space the best, you’re ready to pick out some samples. 

cooltonedwhites.jpg

We recommend taking colour swatches or tester pots home to ensure you love your colour choice!

DIY Tips from Benjamin Moore

shutterstock_551806594.jpg

Doing renovations yourself can be a rewarding experience, but also tests your skills!

To get expert advice, check out the following links brought to you by Benjamin Moore.


As always, call either of our stores if you have any more questions!

Clancy’s Rainbow (Fanshawe & Wonderland) 519-472-1116

Clancy’s Rainbow (Adelaide & Cheapside) 51-434-3201


Don’t forget to follow us on social media for inspiration, tips and ideas!

Revamping a Playground using Benjamin Moore’s ARBORCOAT® Premium Exterior Stain

100 Things 2 Do Playground Project

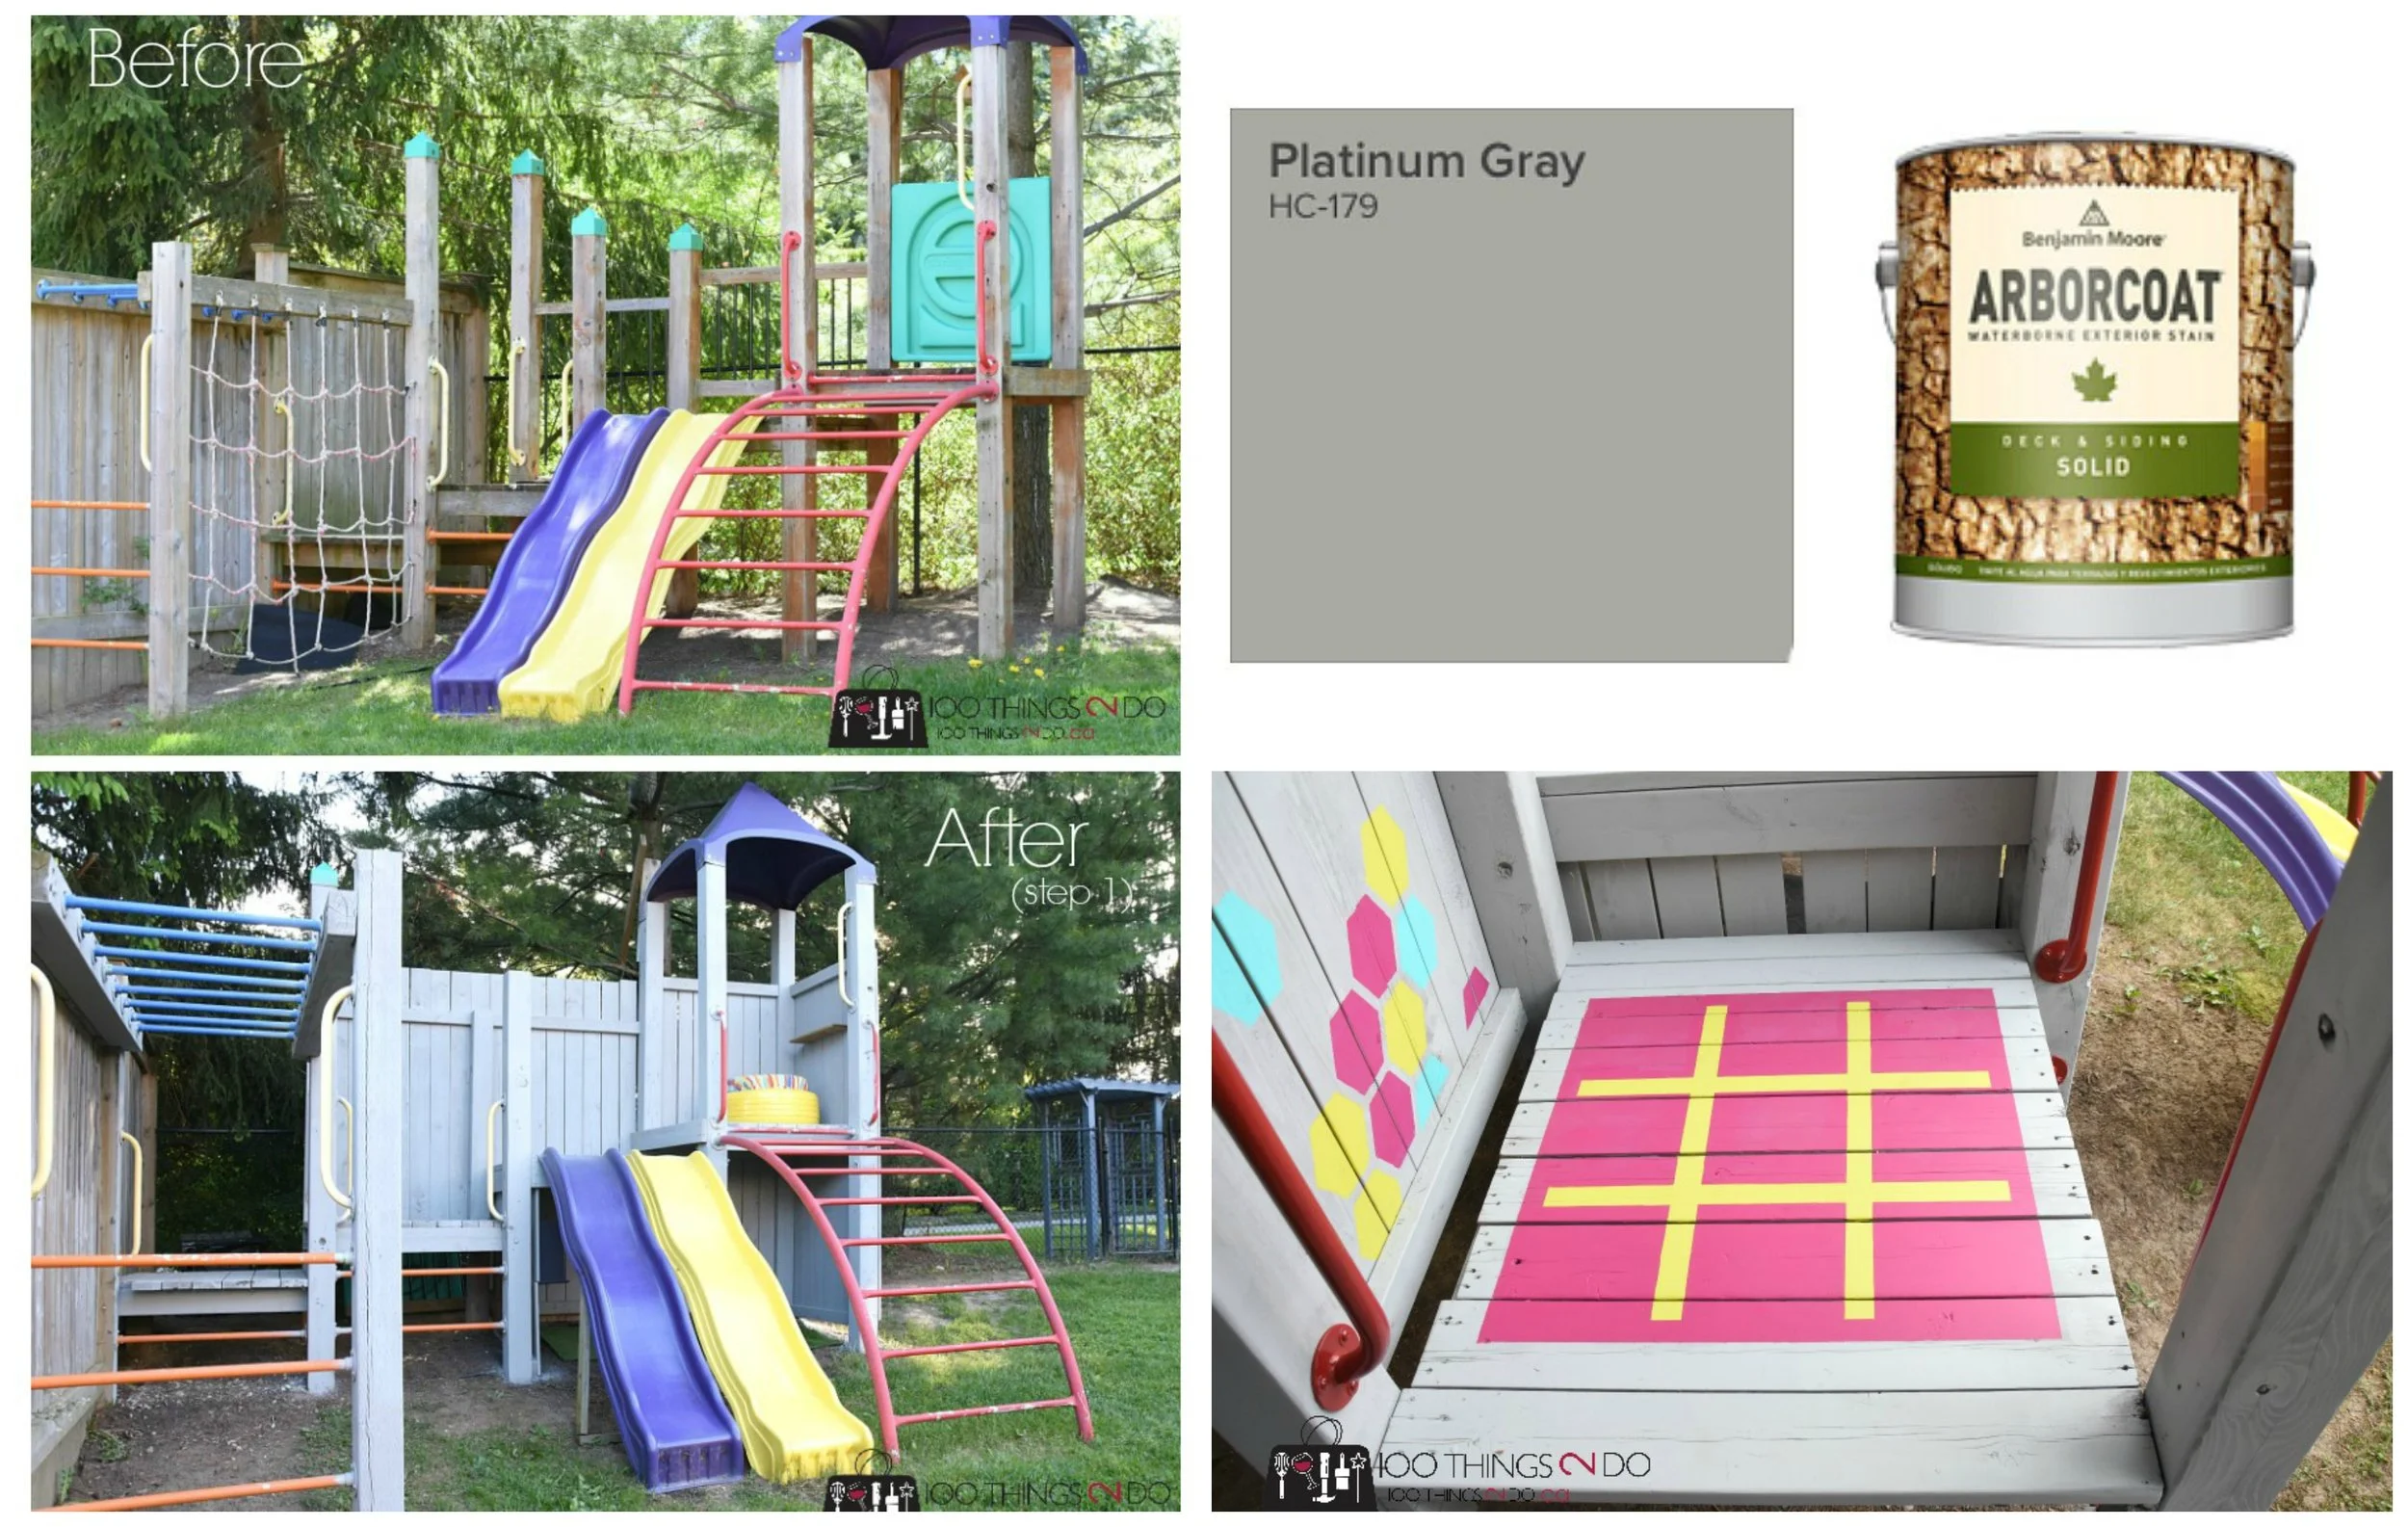
It’s fun when one of our regular clients comes into the store and tells us they have a special project that they want to work on.  This projected happened to be a revamping of a playground structurein their backyard with a bit of a treehouse component.  At Clancy’s Rainbow, we are always up for the challenges that our clients give us, whether it is choosing the perfect pink for your baby girls bedroom or the darkest navy for your home theatre or colours for your outdoor playground structures, we are here to help bring colour into your life.  You can imagine the fun our design team had with this particular project: making a children’s playground a little bit more grown up - a tween makeover.  By adding great little touches like tire seating, shelving nooks and playful games stencilled onto the platform, these tweens are bound to enjoy their new outdoor play space. 

Our client is the creative DIY blogger Shelly from 100 things 2 Do.  She came into our store with pictures and ideas of what she wanted to do to update the playground structure.  Sections were going to be added and expanded.   A reading nook area was going to be created and decorated with a few recycled objects.  Some projects were already completed as she used paint to transform these items.  Shelly wanted to add a bit of fun and whimsy to the playground and our team was happy to collaborate .  Once we understood the overall vision for the project, the design team came up with a few suggestions of colours and patterns that she could incorporate. 

100 Things 2 Do - Playground makeover 3 - 1.jpg
100 Things 2 Do - DIY Playground

We proposed incorporating a tic-tac-toe game that she could easily paint in bright colours right on the playground structure.  Shelly used Arborcoat to stain the fence, the structure and the accessories.  She liked how the solid finish provided the versatility of being able to tint it in any Benjamin Moorecolour.  Arborcoat Stain comes in easy to use water base or Classic Oil formulas which comes in 5 finishes:

  • ARBORCOAT Stain-Translucent Flat (F623)

  • ARBORCOAT Clear Coat Low Lustre (K636)

  • ARBORCOAT Stain- Semi Transparent Flat (K638)

  • ARBORCOAT Stain- Semi Solid Flat (K639)

  • ARBORCOAT Stain- Solid Matte (K640)

We are so please to be able to help Shelly out with her project.  You can read all of the posts on her blog:

If you need any help choosing colours or you need a little help with a design.  Come into our store located at 1030 Adelaide Street North and our new location (coming soon) on Wonderland Road North, in London, Ontario.  We will be happy to help with your design dream..